Are you looking to add a splash of color to your wardrobe or home decor? Well, we have an exciting technique for you! Picture this: vibrant hues swirling and blending together, creating unique patterns that are sure to turn heads. But here’s the twist – what if we told you that you could achieve these stunning results with just a simple spray bottle?
Yes, it’s true! In this article, we will reveal the secret behind transforming ordinary fabric into a work of art using tie dye and a spray bottle. By harnessing the power of color and creativity, you can express your unique style in a way that is both trendy and fun.
Gather your materials, prepare the tie dye solution, choose your fabric and design – we’ll guide you through each step of the process. Whether you’re a seasoned DIY enthusiast or just starting out on your crafting journey, this technique is perfect for anyone seeking to add their personal touch to clothing, accessories, or even household items.
So get ready to unleash your inner artist as we dive into the world of tie dye in a spray bottle. Let’s create something amazing together!
Gather Your Materials
Get ready to gather all your materials for this tie-dye project! First things first, you need to know where to buy tie dye supplies. You can find them at craft stores like Michaels or Jo-Ann Fabric, as well as online retailers such as Amazon or Etsy. Make sure to get a variety of colors and sizes of tie dye bottles, depending on the design you want to create.
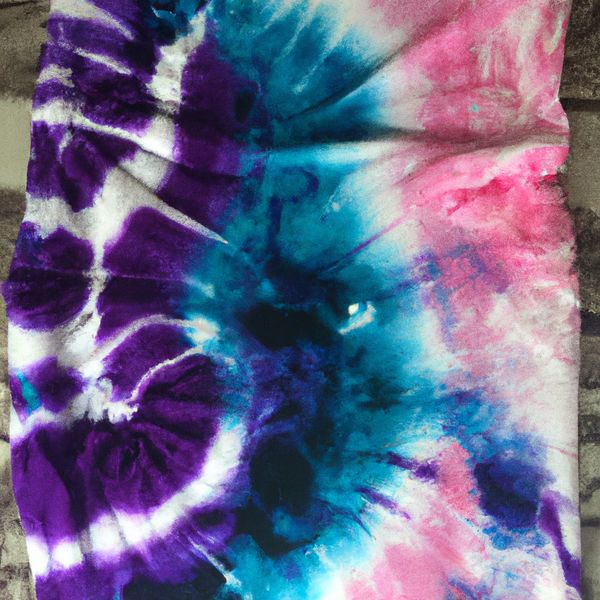
Once you have your tie dye supplies, it’s time to explore different tie dye techniques. There are so many fun and creative ways to make unique designs on your clothing using spray bottles. One popular technique is the spiral pattern, where you twist your fabric into a spiral shape and then apply the different colors of dye in sections.
Another technique is the bullseye pattern, where you start with a small dot in the center and gradually add more circles of color around it.
Remember, when using a spray bottle for tie dying, it’s important to protect your work area with plastic or newspaper and wear gloves to avoid staining your hands. Also, be sure to follow any instructions that come with your specific brand of tie dye for best results.
Now that you have all your materials gathered and some ideas for different techniques, let’s move on to the next step: preparing your fabric!
Prepare the Tie Dye Solution
Create a colorful concoction by combining vibrant hues. To prepare the tie dye solution, you’ll need to gather your materials and follow a few simple steps.
First, determine the desired dye concentration based on the intensity of color you want to achieve. This will depend on personal preference and the instructions provided with your tie dye kit. Once you’ve determined the concentration, mix the dye powder with water in a container that’s large enough to hold all of your fabric.
To engage your audience further, here are two sub-lists:
- Experiment with alternative application methods:
- Use a spray bottle: Fill a spray bottle with your prepared tie dye solution for a more controlled and precise application.
- Use a dropper: Use a dropper to apply small amounts of dye onto specific areas of your fabric for intricate designs.
- Important tips for preparing the tie dye solution:
- Stir well: Make sure to thoroughly mix the dye powder and water until it’s completely dissolved.
- Test colors: Before applying the solution onto your fabric, test it on a scrap piece or white paper towel to make sure you’re happy with the color result.
By following these steps and exploring alternative application methods, you can create unique and vibrant tie-dyed creations that reflect your personal style. Have fun experimenting!
Choose Your Fabric and Design
Selecting the perfect fabric and designing your masterpiece is an exciting opportunity to let your creativity shine! When it comes to tie dye, choosing the right colors can make all the difference. Consider what mood or vibe you want to convey with your design.
Bright and vibrant colors like red, yellow, and blue can create a fun and energetic look, while pastel shades like pink, lavender, and mint green can give a more delicate and soft appearance. Don’t be afraid to mix and match different hues to create unique combinations!
In addition to selecting the right colors, exploring different tie dye techniques can add depth and complexity to your design. Traditional spiral patterns are always a crowd-pleaser, but there are so many other techniques to try! You could experiment with folding techniques like accordion or pleats for a more structured look. Or perhaps you might want to try shibori-inspired methods that involve binding or stitching the fabric before applying the dye.
Remember, tie dye is all about expressing yourself through color and pattern. So don’t be afraid to get creative! Whether you’re using a spray bottle or another application method, have fun with it and let your imagination run wild.
Your fabric choices and design decisions will ultimately reflect your own personal style, making each piece one-of-a-kind. Happy tie dying!
Apply the Tie Dye
Once you’ve settled on your fabric and design, it’s time to dive into the exciting stage of applying the tie dye. Just like a painter with a blank canvas, you can unleash your inner artist and watch as the colors dance across the fabric, transforming it into a vibrant masterpiece.
When it comes to applying tie dye, there are alternative methods that can add even more creativity to your project. One popular method is using a spray bottle. Simply mix your desired dye colors with water in separate bottles, and then spray them onto the fabric in any pattern or design you desire. This allows for greater control over where the dye goes and creates unique effects.
However, if you encounter any issues during the application process or find that the results aren’t what you expected, don’t fret! There are troubleshooting steps you can take to fix any problems. For example, if the colors appear too dull or faded after washing, try increasing the amount of dye used or extending the soaking time. If your design turns out blurry or smudged, make sure to apply less pressure when squeezing out excess dye from the fabric.
Remember, tie dying is all about experimentation and embracing imperfections. So don’t be afraid to try different techniques and have fun with your creation!
Let It Set and Rinse
Allow the vibrant colors to penetrate and meld with the fabric as you let it set, creating a mesmerizing blend of shades that will come to life when rinsed. Allowing the tie dye to dry properly is crucial for achieving the desired effect.
Once you’ve applied the tie dye, resist the temptation to immediately rinse it off. Instead, carefully place your tie-dyed creation in a plastic bag or cover it with plastic wrap, ensuring that no colors bleed onto other areas. This step allows the dye to fully saturate and bond with the fabric fibers, resulting in more vibrant and long-lasting colors.
As you let it set, consider adding different colors for a unique effect. Experiment with various combinations of dyes to create eye-catching patterns and designs. Injecting contrasting hues or blending complementary shades can produce stunning results that truly make your tie-dye stand out from the rest.
After allowing sufficient time for the dye to set, it’s time to rinse your creation. Start by removing any excess dye by gently squeezing or wringing out the fabric under cool running water until most of the color stops bleeding out. Then, fill a sink or basin with cold water and submerge your tie-dye piece completely. Swish it around gently for a few minutes to remove any remaining excess dye.
Remember, proper rinsing is essential for preserving your tie-dye’s vibrancy and preventing colors from bleeding onto other garments during future washes. So take your time and ensure all excess dye has been thoroughly removed before moving on to enjoy your beautifully crafted masterpiece!
Frequently Asked Questions
Can I use regular fabric dye instead of tie dye for this project?
Yes, you can use regular fabric dye instead of tie dye for this project. Try using fabric markers for tie dye and experimenting with different dyeing techniques to achieve unique results.
What are some common mistakes to avoid when applying tie dye with a spray bottle?
To avoid drips and achieve even coverage when applying tie dye with a spray bottle, start by using a fabric that absorbs well. Hold the bottle upright and spray from a consistent distance. Take your time and move in smooth, sweeping motions for best results.
How long should I let the tie dye set on the fabric before rinsing it?
To achieve the best results with tie dye techniques, it is recommended to let the tie dye set on the fabric for at least 6-8 hours before rinsing. This allows the colors to fully penetrate and bond with the fibers of the fabric, resulting in vibrant and long-lasting designs. The best fabrics for tie dye include 100% cotton, rayon, and silk as they absorb and hold the dyes well.
Can I mix different colors of tie dye in the spray bottle to create unique patterns?
Mixing different colors of tie dye in a spray bottle allows you to create unique and vibrant patterns on your fabric. The possibilities are endless, giving you the opportunity to express your creativity and stand out with your one-of-a-kind designs.
Is it possible to use a spray bottle for tie dye on delicate fabrics such as silk or chiffon?
Yes, you can use a spray bottle for tie dye on delicate fabrics like silk or chiffon. To achieve vibrant colors, dilute the dye with water and mist the fabric from a distance.
Conclusion
After following the steps mentioned above, you’re now ready to let your tie dye creation come to life! By putting tie dye in a spray bottle, you’ve unlocked a world of vibrant and mesmerizing designs.
The process is simple yet effective, allowing you to create intricate patterns on various fabrics. So go ahead and embrace your inner artist as you apply the tie dye solution with precision and watch the colors blend beautifully.
Allow it to set, rinse it off, and voila! Your masterpiece is complete.